Showing posts with label eylure. Show all posts

Monday, 10 June 2013

Prom: Leavers Ball!


So I know I am super late with this post seen as my prom was in April... But I've just been incredibly busy and stressed doing my A-level exams which are thankfully now finished, which means I can fully get back to blogging yay! 

First of all, I found my dress unexpectedly in Ted Baker outlet; I loved how simple and classic it was in the typical 'prom' shape, but I thought the added bronzed beading on the bust made it more interesting and perfect for prom. Seen as this was in Ted Baker outlet, I got this dress for a perfect steal at £100 instead of the original £265 price tag, so I was pretty happy with that bargain! 


Accessories:
Bag- Monsoon £25
Shoes- Mango £30 


Earrings- Miss Selfridge £10


Make-up:
The key thing about prom make-up is that it is ultra long-lasting. I applied my make-up at around 4.PM, and was out until 4. AM, so it had to be long lasting or else my face may have melted off completely. Besides, I have oily skin so I it was paramount for me to make my make-up as long lasting as possible in order for me to keep stress free. Having said this, I can safely say that my make-up stayed in place for this full amount of time, with me only having to touch up on powder/lipstick once throughout the night. So I am going to recommend these fantastic products that kept my make-up in place! 

First things first for longevity is to use a primer; even if you don't have oily skin I would advise using a primer for an occasion like prom in order to make sure your make-up does not budge. I swear by Nivea Express Hydration primer; it is super smooth and dries instantly and really keeps my base make-up intact. 

For foundation I used Revlon Colourstay Foundation for oily/combination skin which I can honestly say is the best foundation I have ever tried for oily skin. It gave super good coverage which was perfect for an occasion like prom where you want a flawless finish, and it did not budge at all. Although, as a result, this foundation is quite heavy, I feel like it is absolutely worth it for the full coverage and longevity provides, which was a complete life saver for me at prom. If your looking for a super long-lasting foundation, I seriously recommend this!

The final product which I would seriously not be without at prom is a powder in order to set your make-up firmly in place. I used my trusty Rimmel Stay Matte powder and took this with me to touch up throughout the night. This powder is truly amazing and set my base perfectly; it did not disturb the colour of my foundation or allow my oiliness to break out which I half expected due to my oily skin, but the combination of this and Revlon Colourstay was a serious miracle worker! 

I was also seriously impressed with how my eyelashes stayed perfectly intact all night! I half expected to have one eyelash falling off throughout the night and took glue with me just in case  but my Eylure Cheryl Cole lashes miraculously stayed in place perfectly.

I went quite bold on my eyes with a bronzed, golden, smokey look, so I went for fairly neutral pink lips and used my favorite Bobbi Brown Rich Lip Color in Wild Rose, which is also a super long-lasting formula which is perfect for prom. These lipsticks are beautiful and moisturising, yet provide a highly pigmented colour on the lips which lasts all night.


Me and my gorgeous friends at Prom!

xox


Friday, 1 March 2013

February Favourites

Hey guys!
I'm very excited to be doing my first ever monthly favorites post! I know how popular they are on the blogging circuit and enjoy reading them a lot myself; they are a great way of finding out which products are worthy of testing and repurchasing again and again, a great excuse for buying more products because of how amazing they are! This month I have been reaching for the same products over again, some newly purchased ones and others which I have simply rediscovered. These are products which I honestly can't recommend enough and are true staples in my beauty kit. Hope you enjoy this new kind of post!


Korres Lip Butter in Jasmine- this has been a firm favorite of mine ever since I tried it a few weeks back, but I have been using it non stop this month. The reason this is better than the average lip balm is due to its consistency, its a butter as opposed to a balm therefore it really moisturizes your lips a lot better, just like a body butter would do to your skin. There are other flavors available but this one is my favorite as it smells incredible. I will definitely have to repurchase this again as mine is quickly running out! You can see my full review on it here

Soap & Glory Hand Food- For some reason my hands have been particularly dry lately, so I have been reaching for this all the time. First of all, it smells unbelievable just like all the other products by Soap & Glory- one of the reasons I love them so much! If you haven't smelt it I would strongly advise you do. What's more, it does the job perfectly and helps keep hands permanently smooth if you apply frequently enough.


Urban Decay Naked Palette- I simply could not have a favorites post and not include this. I've used this trusty old palette for literally every party I've been too, especially this month, and the lighter shades are great for creating natural everyday looks. There are so many looks you can create, it is such a versatile investment that I would seriously recommend. I don't know how I coped without this for so long as it instantly became one of my favorite beauty products ever! All my other eye shadows have been seriously neglected ever since this came into my life. Enough said, you can read my in-depth review here

No7 Lash & Brow Perfector- Recently I have been trying to grow out my brows slightly, so this brow gel has really been indispensable, particularly in taming those unruly hairs (typically just above the arch). I apply this just after grooming them, and before filling them in with powder. It is great for perfecting your ideal shape, and makes it easy to fill them in as you follow your natural shaping. It keeps them in place, yet it doesn't stiffen them too much that they look unnatural. You can view my brow perfecting guide here

L'Oreal Volume Million Lashes Mascara- This is a product that I forgot I had completely so stopped using it for a while. I rediscovered it the other day, thinking it was used up, but to my surprise it was still usable so I have been using this ever since. I really love the brush to this because it has an anti-clump wiper so you don't get that overdone, clumpy and fake look which can be common with many mascaras. It therefore creates really long, but separated even lashes with an ultra black coating. The brush is also really handy for bottom lashes which is great, the MAC mascara I normally use has a brush which is so big that I have to use a different mascara for the bottom lashes. Great mascara, I would particularly recommend and L'Oreal mascara if your on the hunt for a new one. 

Eylure 'The Chelsea Look'- Before using these lashes putting on false eyelashes was an absolute pain. These ones by Eylure are super easy to apply; they go on really smoothly without pinging up either side which can be so annoying! This particular lash style is probably my favorite lash, I only wear them for going out in the evening because they are quite dramatic, however not so much as to look overpowering or fake. They are my go-to party lash, instantly adding drama to your eyes and making them appear much bigger. 


 Real Techniques Expert Face Brush- This is a brush which I brought last week and ever since, this has truly enhanced my foundation and made application so much quicker and easier. I love the roundness of this brush for applying a flawless base as I previously used an angled brush, however this gives you the chance to really buff the product into the skin in a circular motion, getting into every crevice in the skin thereby giving you better coverage and a more radiant appearance. I think almost every beauty blogger owns these brushes, and I can see why! They really create that flawless base which transforms your whole look. Having the base sorted is what I think is the most crucial stage of make-up application; it just makes your skin look fresher and more radiant if you have your foundation buffed in beautifully. 

Sleek Blush in Pomegranate- This is another product which I rediscovered this month as I had been so used to using my trusty Rimmel Pink Rose. That however, sadly ran out so I found this. The colour looks a little garish and scary straight from the pan, however this creates the most pretty effect on the skin. The rich purple shade is actually quite soft if you only apply a small amount, and it also leaves a slight shimmer to the skin.  New favorite blush for sure, and what's more is that it suits all skin tones so is a great staple blush. 


 (Celestial)
(Waterlily, Rebel, Celestial)

No7 Moisture Drench Lipstick in Waterlily- This is basically a gorgeous, everyday muted bright pink. It is a really wearable shade so I have been wearing this constantly, it goes with every look so it is a great one to have in your everyday make up bag. 

MAC's Rebel Lipstick- I love this shade so much. You can check out my previous post for a full review, but this is essentially my favorite lipstick ever. It is the most beautiful dark pink, to purple shade with a Satin smooth finish. It creates a great statement for an evening out, instantly drawing attention to you. Furthermore  MAC lipsticks are super great quality with excellent pigmentation meaning they stay put for the entire night, not something every brand can boast about. 

Rimmel Apocalips in Celestial- This is probably my favorite February favorite. I purchased this last week and have been wearing it almost every day since. I had been dying to get my hands on them ever since, because so many beauty bloggers have raved about them. If you haven't heard about them they are are glossy formula, yet they still manage to contain the same pigmentation as a lipstick. This means they have really great staying power which is unusual for a regular gloss. This however is by no means a regular lip product, as it somewhere in between the two best formulas. There is also none of that dreaded hair and gloss sticky mess as these are completely nonstick! Celestial is the perfect shade for me, a gorgeous neutral pink which is perfect for every day. If you haven't tried them, go try them now. 

What products have you been loving this month?
xxxx

Saturday, 9 February 2013

Maybelline Colour Tattoo: Review


This post is far too long overdue as I've had these little beauties sitting right on my desk waiting to be reviewed for weeks now. I discovered Maybelline's Colour Tattoo eye creams after hearing a lot of hype about them recently, particularly on YouTube and the whole blogging scene. I don't normally go for eye creams as I have so many powder shadows that work great, teamed with a bullet-proof primer of course! I have quite oily eye lids so I bought these with slight skepticism, thinking they might just crease and literally fall off my lids as some cream based shadows have done previously, yet I was really happy with this product. First of all, they glide onto the lids really smoothly, and can even act as a great base for shadow if you want to really layer colour on top. You can apply these with your finger quite simply, or use a spare concealer/ cream shadow brush as long as it is synthetic. These have really unique staying powder which is unusual for cream shadows; I didn't even need a primer with these which is great. They stayed on all night, literally until I decided to take it off. Super saturated colour with excellent pigmentation that will not fade. 
I went for the shadows 'On and on bronze' and 'Pink Gold'. I much prefer the bronze colour as brown shades are my absolute favorite for my eyes; I think they really make blue eyes pop. The pink however, is a much softer, more subtle every day shade which I'm sure will come in handy. You can pick these up for £4.99 each, so if you haven't tried these yet I seriously recommend them. It is such an easy, quick and effortless way to create a dramatic look, literally just one sweep across the lid and your eyes appear transformed. 


(above, 'On and on bronze', then 'Pink Gold'. Also check out the amazing first set of lashes- Eylure 'The Chelsea Look)

xxx

Monday, 4 February 2013

Gunmetal: New Eye Make-up Look


***

This is just a quick post to show my most recent make up look, once again for another 18th party. I was desperate to use my Urban Decay Naked palette which I've already used so much already; there is an absolute abundance of looks that be can be created with this palette (see my last post for review). I also know that a lot of you have it therefore this look will be really easy for you to recreate. I used the four colours that I was most excited to experiment with:

'Toasted'
'Hustle'
'Creep'
'Gunmetal'

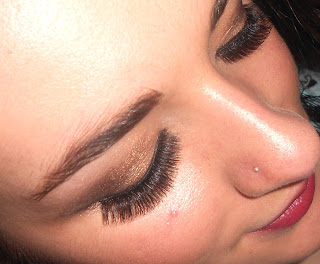
First I began by using the lightest of the four colours, Toasted, and put this all across the lid, taking it quite high up. I always find that if your using a light colour, going quite far up with it is acceptable; not with a dark one though. Toasted also makes a great alternative highlighter as it is a light shimmery pink, perfect for accentuating your eyes. I then used some Hustle in the center of the lid to create more depth and structure to the eyes, followed by the contouring of my favorite colour- Gunmetal- in the crease, taking it quite far along the eye. I winged this out quite a bit and blended- a lot. It is much easier to blend with a clean eye shadow brush so always make sure you have one handy. You can get into quite a bit of a mess if you used one with shadow on. Once this is blended so there is no harsh, obvious lines, take the darkest colour, creep, and take this just into the crease. Then blend this into Gunmetal to really make your eyes stand out, also making them appear larger. The key to this look was false eye lashes, which have become a staple in my make-up kit for parties lately. They add instant evening glamour and really frame your eyes. I used my new favorites from Eylure's 65 celebratory year collection in The Chelsea Look. They are really full which I love yet they do not make your eyes look too heavy. To create a more natural look, use mascara to go over the false lashes, thus adhering your natural lashes to the false ones. 
I really like this look because I think the contrast of the more delicate pink of Toasted balances out the sharp and deep Gunmetal. As they are both also really shimmery, I think it works well in creating a pretty and glamorous look.  

Saturday, 2 February 2013

Last Night's Make-Up

Last night I went to an 18th party and thought it would be a good opportunity to use my brand new Urban Decay Naked original palette. I had been lusting after this cult product for months but finally decided to 'invest' in it (review coming soon). I love this palette simply because it has all the shades that I  personally would ever need. I much prefer muted nude and brown tones as opposed to bright colours, all though of course they are always fun to try out too. 
I decided to use three of the colours which instantly stood out for me: 
'Half Baked'
'Smog'
'Dark Horse'


Over lashings of primer I applied 'Half Baked' across the entire lid, taking it quite high above the crease. I then took the colour 'Smog' and applied this through the crease, and winging out slightly. I then blended this thoroughly as to avoid any harsh lines, and then took the darkest shade of the three 'Dark Horse' to darken the crease further, thus creating more depth to the eye, thus making them appear slighting larger. I then blended 'Smog' and 'Dark Horse' together and took this under the eye slightly, making sure to join this with the slight winged out shadow from the crease. An almost sideways triangle is created but it is key to blend this so it fades out and is not as harsh. I blended all three colours seamlessly, and then took the shade 'Virgin' which is the lightest in the palette and thus makes the most beautiful highlighter ever. It is an off-white shade, with flecks of pale pink sparkle which really creates a strong highlight- perfect for the brown bone. I dusted this across the brow bone and then blended one last time so it faded into the darkest colour. I then added a slight bit of 'Virgin' across the tear-duct to open and enhance the eye. I then of course, applied a subtle stroke of my trusty Maybelline gel liner across the top lash line, layered on a thick coat of my Opulash Optimum Black Mascara by MAC, and then used some ultra-thick false lashes by Eylure to top of this look.


I know many of you have the Naked palette so would be interested to know if you love it as much as I do even after one use! I know there are so many looks that can be created with it which is really exciting!
xxx

Tuesday, 1 January 2013

Black and Gold NYE


So seen as last night was New Year's Eve (Happy New Year!) I thought I would go for a sparkly black and gold theme. I built my make up look and nails around my dress (topshop black and gold velvet glittery) and think it really epitomized the new year theme.


  • To get my make up look I began using a primer from Nivea (Express hydration primer). I don't normally use a primer as I find that a good moisturiser does the same job, but I had this one as a sample from Glamour magazine so I thought I would give it a try. It went on so smoothly and had instant absorption as it was very thin, so I could apply my foundation super quick afterwards. 
  • For my foundation I used one from No7 which is very high coverage, unfortunately the one I used has recently been discontinued so I won't list it here because there wouldn't be much point, however a new one which is also really great is the Beautifully Matte Foundation from No7. A true match colour service is now available at No7 counters so you can really get that perfect colour match. 
  • For concealer I use my Rimmel hide the blemish concealer to go under my eyes to conceal any dark circles, and also on any blemishes. 
  • I then lock my foundation into place with my Rimmel Stay Matte powder which is my favourite powder ever, really does the trick to keep you looking shine free throughout the night. Apply liberally particularly in the center of the face where shine is most common.
  • Next I used by baked bronzer from Famous by Sue Moxley in shade Hawaii to contour my cheeks to give the appearance of naturally defined cheekbones. I also use this on my temples to give an all round glow to the skin. 
  • For blusher I used Rimmel in shade Pink Rose on the apples of my cheeks to blend into the bronzer creating a more natural look. 
  • For highlighter I used my Benefit High Beam just above the apple of my cheeks where my blusher finishes to create a luminescent finish and youthful appearance to the skin. 
  • To fill in my brows I used my MUA eye shadow using an angled brush to lightly fill in any gaps and strengthen the shape of my brows. 
  • Before applying my eye shadow I used my primer from Front Cover Cosmetics which is really an important step especially if you have quite oily eye lids and you find your shadow often creases or doesn't last.  
  • When doing a strong eye look like this one, using two colours that don't naturally blend into each other, it is key to apply the darkest colour first. I used my black shade first from a Natural Collection compact, starting slightly more than half way onto the lid. I took this up through the crease and winged it out slightly. I then used a clean brush to tidy up the line and blend thoroughly. 
  • Then I used my gold colours which is the same as the other gold look I did the other night, using both colours from Front Cover Cosmetics. Blend as best as possible into the black slightly, but not too much as you will end up with quite a murky colour. I put quite a lot of gold on the tear-duct to open the eye, as opposed to what I usually use which is white. I liberally applied the holographic glitter in the corner of the eye- after all it is NY!
  • Then I used my Maybelline gel eye liner to thinly define my lash line, winging it out quite a bit to create that feline appearance. 
  • Before applying my false lashes, I used my MAC Opulash Optimum Black mascara on top and bottom lashes, and then used my Cheryl Cole Eylure lashes. The key to applying false lashes is to leave the glue a good minute before applying so they stick better, and also to use tweezers and hold the lash in the center with the tweezers and then gently place in the middle of the lash line. Then simply tuck in the sides with the tweezers and leave to dry. I then apply a final coat of mascara to merge both natural and false lashes together. 
  • Use your favourite Kohl eye pencil to line the waterline of your lashes to define if you want that added impact. 
What's on my nails?


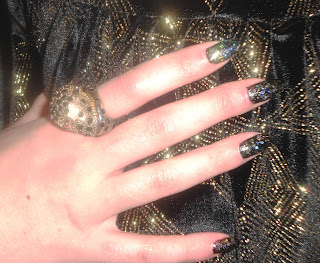
 For my nails I took the black and gold theme to the extreme by using, both from Barry M, using shades 'Black' and then using lots and lots of 'Yellow Topaz Glitter' as a top coat. Not only does this create a super sparkly festive look, but as a top coat this will make the nail polish last a lot longer. I really like this look and I got a lot of compliments particularly about the nails, so I hope that you guys have fun experimenting with it too. 


Saturday, 29 December 2012

Shake the Glitter


Seen as it's Christmas and New Year is fast approaching, I thought this would be a great make-up look for the festive season. I wore this sparkly gold glitter make up for a party last night, and it was so fun to experiment with. For me, Christmas is the one time of year when its acceptable to wear both a striking eye and a bold lip. This look goes perfect with that classic chic red lip, or even a dark purple which is what I teamed it with. Try out this glamorous make-up look for this season and your bound to sparkle.

To get this eye make up look I used:

  • base shadow primer from frontcover cosmetics
  • gold eye shadow by frontcover
  • holographic glitter by frontcover
  • No7 eye shadow in 'Starry Lights'
  • Maybelline gel liner
  • MAC Opulash Optimum black mascara
  • Cheryl Cole lashes by Eylure 
What's on my nails? 
I teamed this glitter look with a classic red from Nails Inc in the colour 'St James' which is my ultimate favourite winter colour- a bold red that's not too dark and serious, slightly pink in tone. I also used Barry M in 'Yellow Topaz Glitter' as a glittery topcoat to add an ultra sparkly festive look. 

Thursday, 6 December 2012

December Beauty Haul


These are products which I have recently purchased for the Winter season, and some which I have been sampling/use especially for this time of year. Firstly, as I was so impressed with the Rimmel lasting finish foundation (which I reviewed in a previous post), I decided to buy another one from Rimmel but opted for this match perfection one instead, as I was attracted to the innovation of smart tone technology which adapts to the colour and tone of skin. I went for shade 003 In true Ivory, which is somewhat paler than I would usually choose purely because of the Winter season as skin would inevitably be paler in complexion. This tone matches my skin exactly. Previously with foundation, even if it is a shade darker It can be blended into the skin to create a natural, yet more tanned look, whereas as soon as this shade was applied even before blending, it matched my skin exactly. It gave me a flawless finish without leaving my skin too dewy which is ideal for the cold temperatures- a dewy look is most desired in the Summer season. Even though I have oily/combination skin, this foundation kept my skin matte all day, without having to apply powder more than once, which I have found with previous foundations. This skin was not too heavy either, thereby allowing the skin to breathe which is great, however my only criticism is that is was a little less coverage than I would like as I had to use quite a fair bit of concealer to cover blemishes, yet I would still highly recommend this foundation, particularly if you already have flawless skin anyway. What's more, this foundation has an amazing scent which is super fresh, and leaves a beautiful to the skin making it look healthy and radiant. I would rate this 9/10, and at £6.99 this is a bargain for quality.  


***
Next I recently received these gorgeous Cheryl Cole lashes from Eylure and they are so amazingly natural, perfect false lashes for the glamorous party season, designed to enhance the natural beauty of your eyes. Fabulous, flirty and flexible they are suitable for all eye shapes and all occasions, with an ultra- lightweight feel. Normally, I'm not a huge fan of false lashes, I normally just prefer to use lashings of mascara to create that desired intense eye look, however these are so natural that they aren't too obvious your wearing them. These lashes just add thickness, but not enough to look 'fake', they also have a subtle winged out effect on the edges which can match your best mascara, creating a really natural, yet beautiful evening look. As always from this range, they are easy to apply with glue included, and reusable. Just make sure you leave the glue for a few minutes until tacky so they stick better, and then gently place on the lash line with tweezers to make sure they are on securely and correctly. Be sure to place the lash on your lash line to measure before applying the glue, the check it lines up correctly, and trim any excess if need be. I finish by applying a coat of mascara over the top of the false lashes to bind them to the natural ones, creating a seamless natural look. Cheryl herself says: "I love the volume of my lashes. Gorgeous, subtle and versatile they can be worn day or night." I would rate these 10/10 as they are the best, most natural lashes I have ever tried. Priced at £5. 


***
Next I have been loving this splendidly silky moisturizing conditioner from Percy & Reed. It is specifically designed for parched hair, which is often a result of the harsh conditions in which winter brings. This conditioner therefore treats your hair spectacularly, giving it the attention it needs to repair itself. I discovered this as a sample in Glamour a while ago, recently started using it regularly the other week and it has already done wonders for my hair. My favorite thing about this product is that it smells unbelievably fantastic, you have to try it if not just for the smell.    

Splendidly Silky Moisturizing Conditioner is packed with moisture infusing marvels;
  • Blueberry Extract which helps to neutralise and protect the hair from free radicals.
  • Grape Seed Oil which is rich in vitamins, minerals and protein.
  • Sweet Almond Oil; rich in Vitamin E and known to help reduce hair fall.
  • Lastly Aloe Vera Gel which detangles, moisturizes, heals and smoothes dry and damaged hair.
All these ingredients combine quite beautifully, to hydrate and deeply nourish your hair, creating luscious looks with added shine, to give you that luxurious treatment that your hair is in need of this time of year. I would give this product 9/10, priced at £16, you can buy any product from this range on their website: http://www.percyandreed.com/


***
My favorite winter moisturizer this season has to be this one from Clinique, its best-selling dramatically different moisturizing lotion. It helps to duplicate the moisture naturally occuring in the skin to provide comfort and balance to your skin. It is such a hydrating moisturizer that you only need a tiny amount on dry areas only, which naturally occur in the winter season even if you
don't normally have dry skin. I like to put this on before bed so it nourishes and moisturizes my skin throughout the night, so I wake up with refreshed and hydrated glowing skin. Also great as a day cream and acts as a good base for make-up. Winner of the Zest Skin Care Awards for Best Day Cream. I would highly recommend this moisturizer and give it a strong 9/10, the only reason why it is not full marks is due to the price which is a little higher than I would like to pay at
£17, however, it is a highly-rated product unsurprisingly as shown by the results.

Dramatically Different Moisturizing Lotion


***
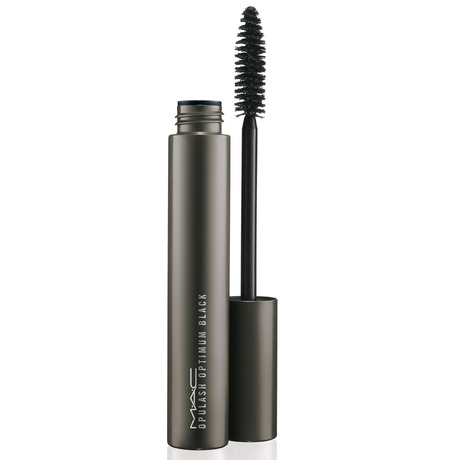
I discovered this Opulash Optimum Black mascara by M.A.C last Christmas as a gift, and I have brought another one since. Whats great about this is the huge and slightly scary brush which is MAC's most bodacious one yet, indicating just how voluminous it makes your lashes. It combines a new formula in a more saturated intense black, with extra voluminization, expansion and curl delivered dramatically. It is perfect for the Christmas party season for all the special occasion events where that desired glamorous and shockingly intense eye look is ideal. If that doesn't persuade you, it lasts 15 hours! This incredible staying power requires quite a strong eye make up remover, as the mascara is literally bullet proof, and most importantly will not flake onto your face throughout the day. I would give this mascara 9/10, and it is £14. This would also make a great gift; I received it last year and loved it, so if you need a stocking filler this is perfect. 


***

I have used my Tangle Teezer now for a few months, and I honestly would not be without it! If you haven't heard of it before, it is an innovative, revolutionary hair brush which will literally get out any tangle whatsoever with no pain, no matter what style hair you have. So impressive are the results, that it has taken the beauty industry by storm overnight. It is the original professional detangling brush, containing a unique teeth configuration which flexes upon contact with tangles, thereby making brushing your hair easy and stress free by removing tangles- not your hair! It delivers impressive results on both wet and dry hair, I particularly like using this after washing my hair when it is damp, as it removes all the tangles before blow drying, what's more it is quick too. It also works on extensions and weaves, so it will work on literally anyone. It really is your hair care saviour and a true detangling solution. Tangle Teezer Original is the only brush that is literally changing lives. "Don't change your lifestyle; change your hairbrush". It is also the perfect compact size so ideal for taking with you on the go, and for travelling especially. Available also in several colours, I brought mine on Amazon for £9.99 and would rate it without a doubt 10/10.