Showing posts with label eye make up. Show all posts

Wednesday, 13 February 2013

How to be a Heartbreaker- Valentines Day Make-up look


Hey guys! I would just like to apologize in advance for the length of this post- but this is one of my favorite make-up looks ever and I can't wait to share it with you. Its also very theme appropriate seen as its Valentine's day tomorrow, its a great look to wear wherever and whoever you will spend it with. Marina and The Diamonds is one of my favorite music artists ever, and her make-up in her video for 'How to be a Heartbreaker' is absolutely divine. She has a few looks in the video but the one I recreated is my personal favorite (above). It is actually quite a simply look with the main focus being the eyes (hence the following abundance of eye closeups!) paired with neutral pink lips and bronzed skin. 


For the all important eyes I used my Urban Decay Naked original palette, which has become a firm favorite in my make-up kit (see my full review here). When using this palette only I also know that I don't have to use a primer underneath as the eye shadows seem to really stay place on me, however of course, if they don't I would recommend a primer. First take the lightest colour, 'Virgin' which is such a beautiful pale pink, off-white shimmery highlighter. Apply this across the entire lid, right up to the brow bone as we want particular shimmer here. Then apply a slightly darker shade, 'Sin', in the middle of the lid to add a bit more depth here and create an illusion of a bigger eye, a good trick also if you have hooded eyes like me. Then I mixed together a bit of 'Sidecar' and 'Hustle' and placed this on the outer corner and through the crease. I took this higher than my usual crease as this is how Marina wears it in this shot, which further creates the illusion of a much larger eye. You should therefore take 'Hustle' quite high up and into the crease, quite deep into the socket. The next step is to blend, A LOT. When you wear quite a heavy eye make-up like this, it is best to have a few clean brushes handy so you can switch. If you carry on using one with a lot of product on this will just smudge as opposed to blending. Also keep a tissue handy so you can wipe off the excess product, saving you from using a lot of brushes which not everyone may have. Once this is blended enough to look fairly soft, take Virgin again on the brow bone to blend into the darkest colour, and take a fair bit into the tear-duct to accentuate and brighten the eye, making the look a lot softer.Then find a narrow brush and, blending together 'Hustle' and 'Sidecar', take under the eye halfway and blend. This is the shadow part done, now you need to take your favorite gel eyeliner as this is one of Marina's staples. Try and get your line as thin as possible, with the line slightly thicker in the center to follow the natural shape of your eye. Then wing out slightly to a point, joining up with your bottom lash line. You can also use a brown kohl pencil to line your bottom waterline. Then apply absolute lashings of mascara, particularly on your lower lashes as this is a real feature of Marina's look. She wears individual false lashes on the lower lash line, however I have tried to create this effect using mascara. I then took some MAC lashes that I cut slightly shorter than the usual lash length to just attach to the end of the eye and create a flared, winged out look, as Marina's top lashes are not overly heavy. Team this with super defined, dark strong brows like Marina's and keep them in shape with some brow gel. 
Finally, use the gel liner to create Marina's signature heart on your left cheek if you wish!


Finish off the look with sculpted cheeks and an all over bronzed glow using the excess on your temples, forehead and nose. Then use a super pretty pale blush to add a slight dash of colour- Sleek's Pixie Pink is perfect for this. Skip the highlighter as the eyes are the main feature and Marina's skin looks more matte than glowy. Use your favorite nude pink lipstick for a subtle finish to the look; I used a nude MAC lipglass over a Revlon Super Lustrous Lipstick in shade 'Sky Line Pink'. 
xxx


Saturday, 9 February 2013

Maybelline Colour Tattoo: Review


This post is far too long overdue as I've had these little beauties sitting right on my desk waiting to be reviewed for weeks now. I discovered Maybelline's Colour Tattoo eye creams after hearing a lot of hype about them recently, particularly on YouTube and the whole blogging scene. I don't normally go for eye creams as I have so many powder shadows that work great, teamed with a bullet-proof primer of course! I have quite oily eye lids so I bought these with slight skepticism, thinking they might just crease and literally fall off my lids as some cream based shadows have done previously, yet I was really happy with this product. First of all, they glide onto the lids really smoothly, and can even act as a great base for shadow if you want to really layer colour on top. You can apply these with your finger quite simply, or use a spare concealer/ cream shadow brush as long as it is synthetic. These have really unique staying powder which is unusual for cream shadows; I didn't even need a primer with these which is great. They stayed on all night, literally until I decided to take it off. Super saturated colour with excellent pigmentation that will not fade. 
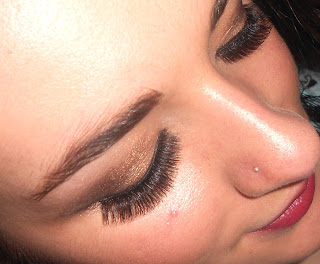
I went for the shadows 'On and on bronze' and 'Pink Gold'. I much prefer the bronze colour as brown shades are my absolute favorite for my eyes; I think they really make blue eyes pop. The pink however, is a much softer, more subtle every day shade which I'm sure will come in handy. You can pick these up for £4.99 each, so if you haven't tried these yet I seriously recommend them. It is such an easy, quick and effortless way to create a dramatic look, literally just one sweep across the lid and your eyes appear transformed. 


(above, 'On and on bronze', then 'Pink Gold'. Also check out the amazing first set of lashes- Eylure 'The Chelsea Look)

xxx

Monday, 4 February 2013

Gunmetal: New Eye Make-up Look


***

This is just a quick post to show my most recent make up look, once again for another 18th party. I was desperate to use my Urban Decay Naked palette which I've already used so much already; there is an absolute abundance of looks that be can be created with this palette (see my last post for review). I also know that a lot of you have it therefore this look will be really easy for you to recreate. I used the four colours that I was most excited to experiment with:

'Toasted'
'Hustle'
'Creep'
'Gunmetal'

First I began by using the lightest of the four colours, Toasted, and put this all across the lid, taking it quite high up. I always find that if your using a light colour, going quite far up with it is acceptable; not with a dark one though. Toasted also makes a great alternative highlighter as it is a light shimmery pink, perfect for accentuating your eyes. I then used some Hustle in the center of the lid to create more depth and structure to the eyes, followed by the contouring of my favorite colour- Gunmetal- in the crease, taking it quite far along the eye. I winged this out quite a bit and blended- a lot. It is much easier to blend with a clean eye shadow brush so always make sure you have one handy. You can get into quite a bit of a mess if you used one with shadow on. Once this is blended so there is no harsh, obvious lines, take the darkest colour, creep, and take this just into the crease. Then blend this into Gunmetal to really make your eyes stand out, also making them appear larger. The key to this look was false eye lashes, which have become a staple in my make-up kit for parties lately. They add instant evening glamour and really frame your eyes. I used my new favorites from Eylure's 65 celebratory year collection in The Chelsea Look. They are really full which I love yet they do not make your eyes look too heavy. To create a more natural look, use mascara to go over the false lashes, thus adhering your natural lashes to the false ones. 
I really like this look because I think the contrast of the more delicate pink of Toasted balances out the sharp and deep Gunmetal. As they are both also really shimmery, I think it works well in creating a pretty and glamorous look.  

Saturday, 2 February 2013

Urban Decay Naked palette

I know this product has been reviewed to death but seen as I've only just jumped on the bandwagon I'm excited to reveal my thoughts on the cult product that everyone seems to have. Ever since I started blogging which was in November, I have heard an unbelievable amount about the Urban Decay NAKED palette, more than any other product on the blogging scene. This of course, means that surely it must be pretty special if everyone uses it and raves about it, prompting me to finally bite the bullet and invest in it. I have heard the Naked 2 palette is supposedly even better than this, however I thought I may as well start with the original first as this is the one that started the hype.


First of all, the packaging is pretty special as it comes in this gorgeous velvet case. It is an ideal size for carrying around, especially if you travel a lot which is understandably, why a lot of make-up artists class this as a must have for on the go. This palette comes with a shadow karma brush which is really soft and the ideal flat size for layering base colouring on the lids. The sizes of each of the 12 shadows are also ideal; they are large enough to get good use out of them but not too huge a size that you won't get through. 

As a lot of people can guess, given by my abundance of eye make-up posts, eye make-up is my favorite aspect of the face. I am particularly drawn to nude shades and deep browns, therefore this palette is perfect for me. I honestly believe that this is the only palette you will ever properly need; it contains all the basic every day shades, but also several more glamorous shades to give you the possibility to create a variation of different looks, you are not just confined to the same tones in shadow like some palettes. It is an extremely wearable palette that will give your look an extra glamour, yet you can still keep it fairly natural. The majority of the shadows are extremely shimmery which is ideal for me because I love this quality, yet if you don't like the shimmery look it may be a good idea to go with another palette. There are nonetheless, a few matte shadows here to give you the variation to mix it up a bit. As would be expected from Urban Decay, all these shadows are extremely pigmented with intense colour, and they stay on really well all night, although a lot of this is also thanks to a brilliant primer. 


The first half of this palette- 'Virgin' to 'Half Baked'- contains what I would class as the more wearable, neutral shades which are great for day to day wear, but are still looks that will take you through to evening wear.     
The first shade, 'Virgin' is the most beautiful highlighter ever as it is not just a solid white shade which is what I normally wear, it has specks of pale pink shimmer which catch the light and of course, highlight the brow bone and tear-duct. 'Half Baked' is the shad I've probably heard the most buzz about, it is a pale gold colour which is really shimmery but also extremely wearable. Great as acting as a base colour and then contouring the eye with the darker tones (see my previous post). 


These next set of shades- 'Smog' to 'Gunmetal'- are a lot more exciting in colour. These are all really shimmery but still manage to be super pigmented also, often a flaw in some shimmery eye shadows. I absolutely adore 'Gunmetal' because it is not just a block black, it is a really dark almost black navy with hints of silver. This makes it not as heavy, it is a lot more wearable and subtle; glamorous as opposed to dark and quite overpowering. I think this would be absolutely divine in the crease, with 'Hustle' or 'Toasted' underneath to create a different kind of smokey eye.

Overall I adore this palette and can't believe it took me so long to finally buy! From now on this will be a firm staple in my make-up kit as there are so many different looks I can envision already. I can at last see what all the hype is that circulated this product, despite the price tag of £36 which I thought was a little steep, I think this product is ultimately worth it. However I would say only buy it if you know that you will wear all/the vast majority of these shades. I brought this because I always wear browns and nudes, fairly neutral colours but also deeper darker tones. I'm not a huge fan of one-off block colour shades which you can only wear with certain outfits, whereas with this palette I know I will get a lot of use out of it as I adore all the colours. If you think that this palette is too extortionate, you should opt for the MUA 'Heaven and Earth' palette which I also have, and it is actually a pretty good dupe for this. It has a lot of similar nudes, yet not the darker tones yet another of their palettes include these. The colours are also great, yet the Urban Decay shadows do have better staying power I've noticed and are generally better quality, which is no surprise due to the hefty price. Altogether though, with the brush and 12 shadows included I think it is a pretty good investment, it is something that you will have for ages and you'll be surprised by the amount of looks that you can create with this palette alone. 

If you are one of many who have also tried this, what do you think of it?
Have you tried the Naked 2 palette?

xxx


Last Night's Make-Up

Last night I went to an 18th party and thought it would be a good opportunity to use my brand new Urban Decay Naked original palette. I had been lusting after this cult product for months but finally decided to 'invest' in it (review coming soon). I love this palette simply because it has all the shades that I  personally would ever need. I much prefer muted nude and brown tones as opposed to bright colours, all though of course they are always fun to try out too. 
I decided to use three of the colours which instantly stood out for me: 
'Half Baked'
'Smog'
'Dark Horse'


Over lashings of primer I applied 'Half Baked' across the entire lid, taking it quite high above the crease. I then took the colour 'Smog' and applied this through the crease, and winging out slightly. I then blended this thoroughly as to avoid any harsh lines, and then took the darkest shade of the three 'Dark Horse' to darken the crease further, thus creating more depth to the eye, thus making them appear slighting larger. I then blended 'Smog' and 'Dark Horse' together and took this under the eye slightly, making sure to join this with the slight winged out shadow from the crease. An almost sideways triangle is created but it is key to blend this so it fades out and is not as harsh. I blended all three colours seamlessly, and then took the shade 'Virgin' which is the lightest in the palette and thus makes the most beautiful highlighter ever. It is an off-white shade, with flecks of pale pink sparkle which really creates a strong highlight- perfect for the brown bone. I dusted this across the brow bone and then blended one last time so it faded into the darkest colour. I then added a slight bit of 'Virgin' across the tear-duct to open and enhance the eye. I then of course, applied a subtle stroke of my trusty Maybelline gel liner across the top lash line, layered on a thick coat of my Opulash Optimum Black Mascara by MAC, and then used some ultra-thick false lashes by Eylure to top of this look.


I know many of you have the Naked palette so would be interested to know if you love it as much as I do even after one use! I know there are so many looks that can be created with it which is really exciting!
xxx